Unity for XR development
This guide explains how Unity fits into the Meta Quest development stack and how to begin building your first XR application.
If you are new to the headset, start with Getting started with Meta Quest 3 before opening Unity.
Why do we use Unity instead of Unreal?
Both Unity and Unreal Engine can be used to develop XR applications. Unreal is particularly strong when a project needs very high visual fidelity, and its Blueprint system can be useful for visual scripting.
For most of our XR and robotics research, however, I recommend Unity.
Unity generally works well for rapidly building and changing research prototypes. It uses C#, has a large XR learning community and provides mature packages for XR interaction.
This is not a claim that Unity is universally better. If your project has a specific reason to use Unreal, go ahead.
Do I need to learn 2D Unity first?
No.
In my opinion, you do not need to complete a series of 2D game tutorials, followed by ordinary 3D tutorials, before you are allowed to touch XR.
Go straight into an XR tutorial.
A good beginner XR tutorial should introduce the Unity concepts you need along the way, such as:
- scenes;
- GameObjects and components;
- transforms and coordinate frames;
- prefabs;
- colliders and rigid bodies;
- C# scripts;
- packages; and
- building and running an application.
Do not skip the next section
XR development has historically been quite messy. Before blindly installing packages from a tutorial, you need a basic understanding of where your application will run and what the different SDKs and toolkits actually do.
Understand where your application runs
A Quest application can run in three main ways.
Standalone XR
In standalone mode, the application runs directly on the Quest headset. The Quest renders the graphics, processes tracking and runs your application using its onboard hardware.
Quest applications are packaged as Android applications (*.apk) and installed on the headset.
This makes the system portable:
- you do not need a computer beside the user;
- setup is simpler in the lab or field; and
- the complete system is easier to demonstrate.
The trade-off is processing power. A Quest uses mobile-class hardware with a much smaller power and thermal budget than a desktop GPU. You will often need to reduce texture resolution, polygon counts, lighting complexity and other visual effects to maintain a stable frame rate.
In XR, maintaining a stable frame rate is usually more important than making one frame look beautiful.
Tethered PC XR
In tethered mode, a computer renders the application and sends the result to the headset through a cable using a system such as Meta Horizon Link.
The headset still provides head, controller and hand-tracking data. However, the computer performs most of the heavy rendering.
This gives you access to a much more powerful GPU and can support more complicated scenes or higher visual fidelity. It is also extremely useful during development because, on a supported Windows computer, you can press Play in Unity and test the scene without creating and installing a new standalone build every time.
Wireless PC XR
In wireless PC XR, tracking data and compressed rendered frames are transmitted over a wireless network.
This gives you the processing power of the computer without physically tethering the user. The trade-offs include:
- compression artefacts;
- greater sensitivity to network latency;
- inconsistent performance when the wireless network is congested; and
- dependence on the computer and network configuration.
A good wireless setup can work extremely well, but it adds more things that can go wrong.
Which mode do we normally use?
For most of our XR and robotics projects, I prefer Standalone XR as the final target.
We usually do not need AAA game-quality visual fidelity. Portability, reliability and quick physical setup are often more valuable than rendering every surface perfectly.
During development, however, Meta Horizon Link can make iteration much faster. A common workflow is therefore:
- test quickly through Link while developing;
- regularly create a standalone build;
- install it on the headset; and
- verify its actual performance on the device.
Note
Meta Horizon Link currently requires Windows. On Linux, you can still build and deploy applications to the Quest, and Meta also provides the Meta XR Simulator for testing without streaming through Link.
Understand the XR software stack
You will encounter names such as OpenXR, Meta XR, Oculus, SteamVR, XR Interaction Toolkit and Interaction SDK. They are not all competing products at the same level.
A simplified Unity XR stack looks like this (top-down):
| Layer | Examples | What it does |
|---|---|---|
| Your application | Your scenes and C# scripts | Implements the actual research prototype |
| Interaction toolkit | Unity XR Interaction Toolkit or Meta XR Interaction SDK | Provides grabbing, ray interaction, hand interaction, locomotion and UI components |
| Unity XR provider | Unity OpenXR Plugin and Unity OpenXR: Meta | Connects Unity to an XR runtime and exposes supported features |
| API standard | OpenXR | Defines a common interface between XR applications and runtimes |
| XR runtime | Meta Horizon OS or Meta Horizon Link runtime | Communicates with the device, tracking system and compositor |
| Hardware | Meta Quest 3 and its controllers | Provides displays, sensors, tracking and input |
An SDK, or software development kit, is a collection of packages, classes, components, prefabs, examples and tools that help you build applications for a platform.
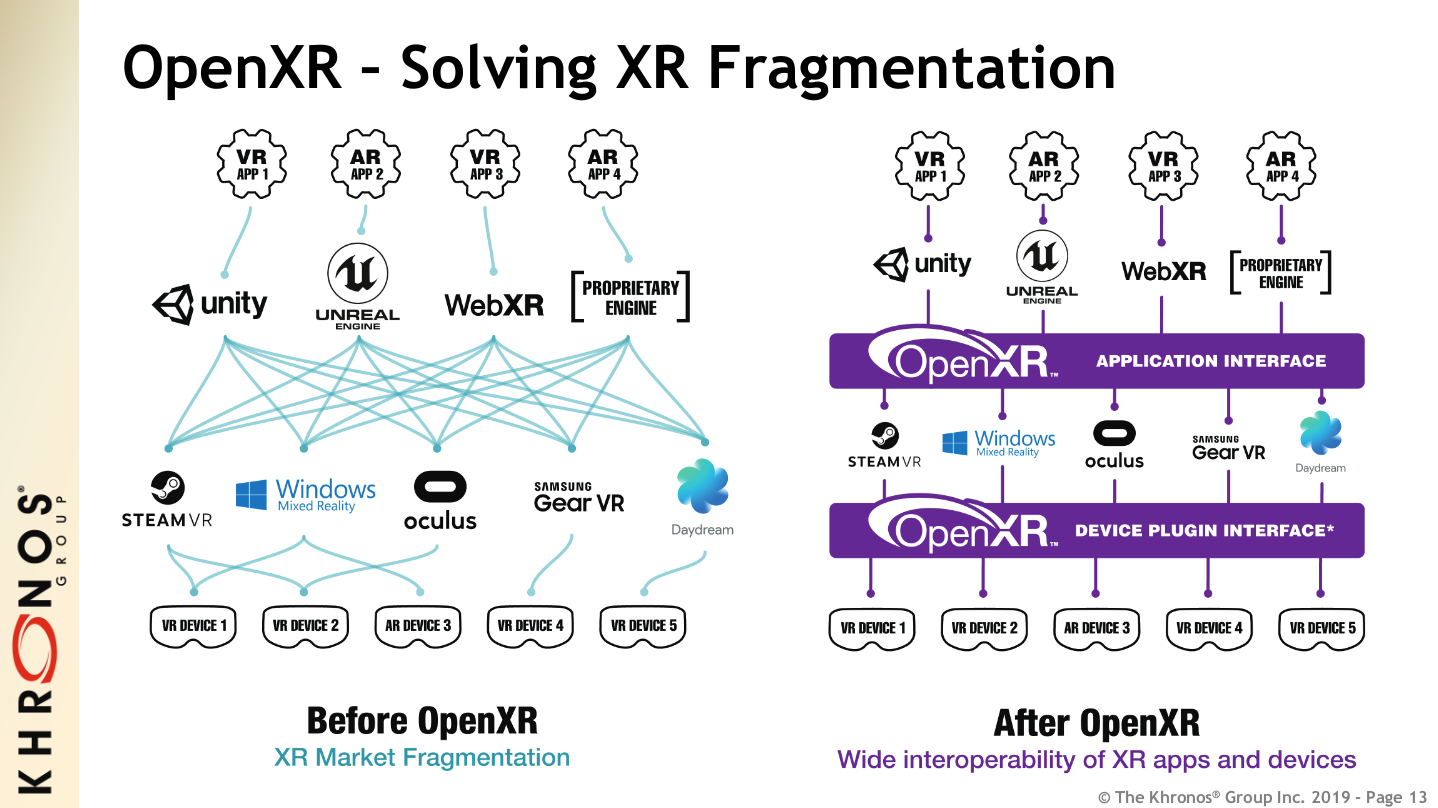
Why was XR development so messy?
Historically, XR platforms provided their own SDKs. Oculus, now Meta, had its own Unity integration. Other headset manufacturers provided different interfaces, input systems and tools.
If you moved an application to another platform, you could end up rewriting much of its interaction layer.
SteamVR helped provide a more consistent interface across PC VR hardware, but it remained centred on the SteamVR ecosystem and PC-based applications.
Then the Khronos Group developed OpenXR. OpenXR is an open, royalty-free standard that provides a common API for XR applications and runtimes.
OpenXR versus Meta XR is no longer the right question
You may find older tutorials on YouTube that ask you to choose between the Oculus or Meta plugin and OpenXR. That is now outdated.
Meta's Horizon OS runtime is OpenXR-conformant, and Meta now recommends Unity's OpenXR Plugin. The older Oculus XR Plugin is deprecated.
You can therefore use:
- Unity's OpenXR Plugin as the underlying XR provider; and
- Meta XR SDK packages on top when you need Meta-specific components or features.
The important choice is usually which interaction toolkit and feature packages you want to build around.
Unity XR Interaction Toolkit
Unity's XR Interaction Toolkit provides a cross-platform, component-based system for common XR interactions.
It includes tools for:
- grabbing objects;
- direct and ray-based interaction;
- controller input;
- locomotion;
- teleportation;
- sockets; and
- user interfaces.
This is a good starting point when cross-platform support matters or when your application only needs relatively standard XR interactions.
Meta XR SDK and Interaction SDK
The Meta XR Interaction SDK provides higher-level components and access to features designed specifically for Meta devices.
These include:
- controller and hand tracking;
- passthrough;
- spatial anchors;
- scene and room understanding;
- co-location;
- Meta-specific interaction components; and
- the Depth API for mixed reality occlusion.
The Meta XR Interaction SDK provides systems for grabbing, poking, ray interaction, locomotion and hand interaction.
Meta also provides Building Blocks, which can add common features and their dependencies to a Unity scene with much less manual setup.
So... how do I choose between them?
The Quest 3 has hardware and platform capabilities that are not universally available on other headsets. OpenXR can be extended with vendor-specific functionality, but using a Meta-specific extension does not make that feature portable to every OpenXR device.
This is the practical trade-off:
- use common OpenXR features and Unity's XR Interaction Toolkit when portability is important;
- use Meta XR packages when you need Quest-specific functionality or want to prototype quickly with Meta's tools.
My usual recommendation
In reality, almost all of my current XR development uses a Meta Quest. For most new projects, I therefore start with the relevant Meta XR SDK packages and Building Blocks.
If I expect the project to support several headset families, I lean more heavily on the XR Interaction Toolkit and minimise vendor-specific features.
If you are unsure which path suits your project, talk to me before building too much.
So, how do I actually begin?
I recommend completing at least one structured tutorial from beginning to end.
In this age of AI, it is very tempting to open Unity and ask Claude, Codex or another coding agent to write every C# script and configure the project for you. I use AI for plenty of programming work too, but I would not recommend beginning XR development that way.
The difficult part of XR development is often not the C# syntax. It is understanding how all of these pieces work together:
- the Unity scene and object hierarchy;
- package and engine versions;
- transforms and coordinate frames;
- tracking spaces;
- input actions;
- physics;
- rendering;
- the user's physical movement; and
- how an interaction actually feels inside the headset.
An AI tool may generate a perfectly reasonable script for the wrong package version, assume that your scene contains components that are not there, or create an interaction that technically works but feels terrible to use.
Follow a tutorial manually first. Understand the basic pipeline. Once you can create, build and debug a small XR scene yourself, AI becomes much more useful.
Tutorials I recommend
I like Valem Tutorials because his videos are practical and beginner-friendly.
Unity OpenXR and XR Interaction Toolkit
This playlist uses Unity 6 and the XR Interaction Toolkit to build a VR project from scratch.
Meta XR SDK
This playlist introduces the Meta XR SDK and its interaction tools, and builds a simple VR game from scratch.
Check the other videos on the channel as well. There are useful examples covering hand tracking, interactions, Building Blocks, mixed reality and multiplayer.
XR tutorials age quickly
Always check which Unity, toolkit and SDK versions a tutorial uses. Menus, prefab names and recommended plugins change regularly.
Use videos to understand the workflow, but use the current official documentation when an installation step or setting no longer matches what you see.
Follow the official Meta guide as well
Meta maintains a detailed Unity development guide and a current Hello World tutorial.
The Hello World tutorial covers:
- installing Unity with Android build support;
- creating a Quest project;
- installing the OpenXR and Meta XR packages;
- enabling Developer Mode;
- adding a camera rig;
- adding hand and controller interactions;
- using Building Blocks;
- previewing through Meta Horizon Link; and
- building and deploying to the headset.
Meta's documentation is not always the most entertaining way to learn, but it should be your reference when a video tutorial and the current software disagree.